The Complete Guide to the Cannabis Life Cycle
Article written by

Homegrown Cannabis Co.American Seed Bank and Cultivation Experts
Content reviewed by

Dr. Lewis JasseyMedical Director - Pediatric Medicine
There are four main stages (or phases) of cannabis growth: germination, seedling, vegetative, and flowering.
One of the things to keep in mind when setting out to grow your own cannabis is that each stage has different light, water, temperature, and mineral requirements. These phases also dictate when you prune and train your plants and harvest the final product. (Harvesting is sometimes referred to as a cannabis plant’s fifth stage of growth.)
Learning about the life cycle of your cannabis plants and what you should expect at each stage can help you ensure that you have a successful grow.
Get your medical marijuana card
Connect with a licensed physician online in minutes.

The Stages of Cannabis Growth: Overview
Growing marijuana generally takes 3-6 months, depending on your strain and setup. The length of each stage is as follows:
- Germination stage: 1-10 days
- Seedling stage: 2-3 weeks
- Vegetative stage: 3-16 weeks
- Flowering stage: 7-12 weeks
The exact duration varies with your choices. For instance, indoor cultivators see faster vegging, and those with sativa strains can expect longer flowering periods.
The vegetative and flowering stages make up the majority of a cannabis plant’s life cycle. When growing outdoors, they transition from the former to the latter when the days get shorter. When growing cannabis indoors, you adjust the light manually to 12 hours of light and 12 hours of dark. This mimics the sun’s behavior after the solstice and tells the plant it’s time to start flowering.
Autoflowering cannabis plants are an exception. These strains flower automatically after a few weeks of vegging without needing a change in the light cycle (photoperiod).
Your choice of seed variety influences which of these grow cycles takes place in your garden.
Download Our 7 Page Guide to Growing Cannabis
Seed Selection
When buying cannabis seeds, you have a choice between three varieties, defined by their sex and reliance on light:
- Regular seeds: photoperiod and contain both chromosomes. Plants are in the vegetative stage under an 18/6 light schedule and flower when it drops to 12/12. When they bloom, they develop into an approximately 50-50 split of males and females.
- Feminized seeds: photoperiod but free of the male chromosome. Plants stay in the vegetative phase while there are 18 hours of light each day. They transition to flowering when the light duration drops to 12 hours and produce only bud-bearing female plants.
- Autoflower seeds: non-photoperiod and most often feminized. You get compact, fast-flowering plants that bloom automatically after 5-6 weeks of veg. It’s best to maintain an 18/6 light schedule or keep lamps working around the clock.
It’s important to buy seeds from reputable shops offering the purest, most stable genetics. You can buy them at certain dispensaries or online from seed banks like Homegrown Cannabis Co. (This company boasts a premium selection of top-tier strains in all three variants, catering to any experience level and preference. They also offer germination guarantees to shoppers who follow appropriate methods and replace all unpopped specimens free of charge.)
Once you have high-quality seeds, you’re set for a successful cultivation journey. Let’s explore the five cannabis growth stages in more detail.
Note: The phases below refer to seed cultivation. If using clones, rooting takes 1-2 weeks, and vegging begins right after.
Germination Stage
Duration: 1-10 days
Light cycle: 18 hours of light and six hours of darkness
In nature, the life cycle of the cannabis plant starts with a seed.
A pollinated plant can produce thousands of seeds, which will return to the earth alongside the dying plant at the end of the cycle. Only a few, if any, survive long enough and in the right conditions to germinate and grow into a new plant. Fortunately, we know exactly what these conditions need to be and can replicate them with a few household items.
Most home growers germinate their seeds with a damp paper towel, warmth, and darkness. This triggers certain hormones and prompts growth, evidenced by a thin white taproot emerging from the shell. This taproot gives seed-grown plants a huge advantage over clones. It shoots down into the soil, anchoring the plant and growing into a healthy, robust, and efficient root system.
Plants grown from seed tend to be stronger, healthier, and more vigorous than their clone-grown cousins. You can expect a richer terpene profile, more resistance to disease, and 20-30% bigger yields from seed-grown plants.
There are various germination techniques, but they all include warmth and moisture. Some drop seeds in moist paper towels or cotton pads; others soak them or employ starter cubes.
Sprouting increases the chances of your seeds popping and becoming prolific plants. Once your cannabis seed pops, you sow it taproot-down into a growing medium, like soil or a Rockwool cube. Ideal sowing conditions are 85°F daytime and 70°F nighttime temperatures with 65-70% relative humidity. The substrate must never become completely dry or soaked, and pH-neutral water is optimal.
When placed in soil (or your preferred medium), the taproot drives down to chase the available moisture. Over the following week, the first hints of greenery appear above the surface. A stem with two rounded cotyledons unfolds from the seed and marks the end of the germination phase.
Expert tip: Stability is essential for sprouts. Maintain optimal temperature and humidity to avoid shocking your crops at their youngest and most fragile.
Seedling Stage
Duration: 2-3 weeks
Light cycle: 18 hours of light and six hours of darkness
Sprouts become seedlings when fan leaves replace the round cotyledons. Greenery gains shape, and roots stretch in this early development stage.
The stem initially contains a single rigged blade, and each subsequent pair of new leaves has more “fingers.” Cannabis has leaves with an uneven number of edges, and most cultivars are seven-fingered.
Plants in the seedling stage are tiny and vibrant green. They enjoy temperatures in the 68-77°F range during lights-on hours and around 10°F less at lights-off. They can absorb water through the leaves and thrive in a relative humidity range of 65-70%.
Overwatering is a potential pitfall at this stage. The small roots can drown when the soil is too wet, and many growers mist their seedlings regularly rather than cycling the medium wet-to-dry.
Seedlings prefer low-wattage light exposure, but you can give them 24 hours of continuous light if you wish. Fluorescent lamps offer the ideal spectrum and intensity. Even when planning to grow outdoors, many people keep their seedlings inside to avoid adverse weather and stress.
Expert tip: Keep the growing environment clean. Seedlings are susceptible to pests and disease at this vulnerable stage.
Vegetative Stage
Duration: 3-16 weeks
Light cycle: 18 hours of light and six hours of darkness
Cannabis plant growth takes off in the vegetative stage. Most cultivators transplant into larger pots or transfer their plants outdoors once they produce proper fan leaves. Intense root and leaf development and vigorous vertical growth typify this phase.
Vegging continues as long as there are 18 hours of light each day. It usually lasts eight weeks outdoors, while indoor cultivators may shorten or extend it.
This stage is where the distinctions between marijuana types start to show. Most sativa-dominant specimens stretch tall and develop long, lean branches with narrow leaves. Indica-dominant cultivars remain shorter and bushier, more closely resembling Christmas trees.
As a rule, cannabis plants enjoy temps of 70–85°F and relative humidity around 50% during this stage. Hotter and more moist environments suit sativa, while indica strains like cooler and drier climates.
Moisture and nutrient requirements amp up in this stage. You need to cycle wet to almost dry when feeding and watering, pouring water around the stalk in circular motions to encourage root expansion. Plants need plenty of nitrogen during veg, so ensure you’re feeding your plants the right nitrogen mix.
This period of intense growth is ideal for training your plants. Remove excess foliage to direct energy where needed and improve light penetration. You can also use mesh or nets to encourage desirable development patterns.
Expert tip: To accommodate the flowering stretch, most indoor growers transition to flowering when the crop is around ¾ of its final desired size.
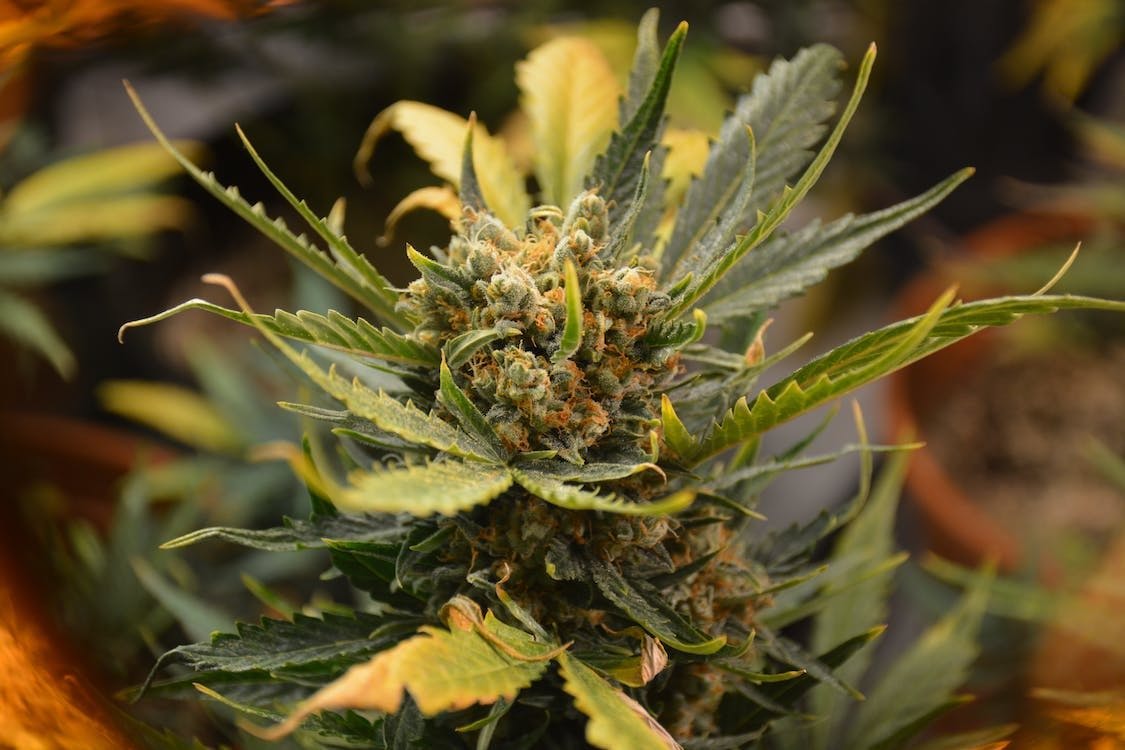
Flowering Stage
Duration: 7-12 weeks
Light cycle: 12 hours of light and 12 hours of darkness
The cannabis flowering stage is the final stage of the plant’s annual life cycle. Flowering times depend on the specific strain and can be a short six weeks (autos, fast versions) or a long, fattening 12-14 weeks for sativa-dominant plants.
We can divide this period into two substages: flower emergence and development.
Pre-Flowering Stage
Pre-flowering makes up the first three weeks of the flowering cycle. During this time, your plants go through a final growth spurt and start displaying signs of sex.
If growing cannabis indoors, you can trigger this phase by introducing 12 hours of uninterrupted darkness each day. Outdoors, it usually begins when days shorten after the summer solstice.
The first week of the flower cycle sees intense, veg-like growth. Your plants can double in size while preparing to bear the weight of future buds — most plants “stretch” at least a foot in height.
During the next two weeks, the difference between male and female marijuana plants becomes visible. You’ll find the following signs of sex on the internodes:
- Female plants have oval leaves with pairs of white pistil hairs.
- Male plants produce round green sacs full of pollen.
When male marijuana plants are grown among females, they can pollinate the females and ruin your crop (if you’re growing for flower). The bud sites become pods for new seeds instead of trichome– and cannabinoid-rich flowers. When growing for flower, you need to discard the males from your grow room or garden.
Besides sexing crops, it’s important to stop excessive pruning and training while transitioning to bloom-specific nutrients in pre-flowering.
Flowering Stage
As the flowering stage begins, the pistil hairs start layering up and forming actual buds. Crops require 12 hours of uninterrupted darkness at this time. Light leaks and disruptions can cause hermaphroditism.
Flowering plants require warmer temperatures, sometimes over 85°F. Humidity should be 35-45% to prevent moisture issues and bud rot. Your ideal bloom-time feeding regimen will contain high doses of potassium and phosphorus.
Carry on feeding and watering wet-to-dry. Gentle pruning is acceptable, but intense trimming and training can stress crops.
Healthy plants will develop a large, central cola over the next five weeks. The flowers can get heavy and bend the branches, so make sure you’re ready to support these branches with stakes, string, or whatever suits your set-up.
Trichomes thicken, and the scent intensifies as you near harvest time. Perform a final flush before the plants fully ripen. Feed with plain water to encourage uptake and use of all the remaining nutrients.
Harvesting
Duration: 4-10 weeks, including the post-harvest process
Harvesting is the final stage of your seed-to-yield journey. You determine the ideal moment to harvest by observing the plants and cross-referencing the flowering times given by the breeder. Trichomes should be milky-white, and pistils rusty and curled at perfect ripeness.
You have two options on harvest day:
- Dry trim: Cut down the entire plant and hang it upside down to try. Then remove the buds from the branches.
- Wet trim: Snap branches from the plants and use small scissors to remove individual buds. Spread them on a drying rack.
In either case, drying and curing follow the harvest and account for the final 2-8 weeks of your growing journey.
Drying happens at 40-50% relative humidity and 70°F. Higher temperatures and moisture levels might damage the trichomes. Most growers leave buds to dry for a week or two.
Curing is optional, takes 2-8 weeks, and dramatically improves the flavor and burn quality. In this stage, you store dried cannabis in a sealed, airtight container at 50-60°F. You open it daily (a process known as “burping”) to release built-up gasses and encourage terpene preservation.
Tip: If using moisture-controlled Boveda jars or Grove Bags, you can skip the burping step of curing. This specialized equipment ensures you put buds at a minimal risk of disruption.
Get Your Medical Card
Connect with a licensed physician online in minutes.
Frequently Asked Questions
What should my cannabis plant look like at five weeks?

Cannabis growth slowly picks up around the fifth week. Your plants are no longer seedlings; they produce branches and proper fan leaves. They’re still short, though, rarely taller than a foot. It’s too early to train, so keep your crop healthy and satiated and let it stretch.
Does a larger pot mean larger buds?
Roots in large pots have more room to expand. Root size affects crop size, and larger plants have more room for bud sites. Indirectly, container size translates into harvest quantity.
Don’t sow in an oversized container right away, though. Increase the pot diameter by four inches with each transplant for optimal root absorption and expansion.
When is the best time to start growing outdoor plants?
Outdoor plants develop during the balmy months of late spring, summer, and early fall. Northern Hemisphere gardeners sow in mid-April when the last frost passes and night temperatures rise above 59°F.