A Beginner’s Guide to Growing Marijuana Indoors
Article written by

Dipak HemrajHead of Research and Education
Content reviewed by

Dr. Lewis JasseyMedical Director - Pediatric Medicine
If you’ve decided to start growing your own cannabis, growing indoors is a great place to start. While outdoor growing has various benefits, indoor grows allow for more control, making them excellent for beginner cultivators.
Certain growing tips apply to both indoor and outdoor growing. However, some things to remember if you want to learn how to grow marijuana indoors.
And whatever smoking method you choose, did you know that medical cannabis cardholders can save significant money on sales taxes? Consider obtaining an MMJ card through Leafwell. Your next smoke session may smell the same, but it’ll likely be cheaper.
Get your medical marijuana card
Connect with a licensed physician online in minutes.

Benefits to Indoor Growing
Indoor cannabis cultivation has numerous benefits. While it can be costly due to the equipment needed, you have more control over your plants. You can dictate the exact water, light, and nutrients they receive. And you don’t have to deal with as many pests.
You also aren’t tied to the seasons or the weather, meaning that if you want to start a grow in the middle of winter, you can, as long as you have the equipment needed to regulate your grow room’s light, temperature, and humidity. This means you can grow continuously, potentially leading to multiple harvests each year.
Finally, you have more privacy. Even if you’re legally allowed to grow weed, growing indoors keeps it away from prying eyes and potential thieves.
How to Set up an Indoor Grow Room
You will need a suitable setup space for your grow room. This could be a spare room, a garage, or a basement. Even a cupboard will do as long as it’s sealed appropriately so light cannot get in. You have to be wary of this if you use an entire room to grow. Cannabis needs dark time. If light gets into your grow area during this time, it can stress the cannabis out and cause hermaphroditism, leading to self-pollination.
Most new growers start with a small, manageable grow room of around 3 feet by 3 feet, which can hold between four and nine plants. Only one light is needed to cover a space of this size, and it is often best to start small to understand the cannabis plant’s growth patterns before moving on to bigger projects.
(Note that some states require that cannabis plants be grown out of the public’s sight, so bear this in mind when choosing where to set up your grow room.)
Items Needed
Indoor growing requires more equipment than outdoor growing. But having access to these items means you can control your plants’ surroundings. For example, with outdoor grows, you can’t control the weather. With indoor grows, however, you can adjust the temperature, humidity, airflow, and lighting as needed.
Some items you will need are:
- Grow tent (a special tent that is black on the outside to prevent light from getting in and has a refractive material on the inside to get the most out of your lights).
- Lights of suitable wattage (more on that later).
- Platform to place your plant pots on.
- Plant pots of various sizes.
- Extractor fan to take hot air away from the top of the grow area.
- Intake fan to pump new air into the room.
- Carbon filters that are attached to your extractor fan to reduce the smell of cannabis.
- Thermometer to ensure you’re keeping your plants at a temperature of around 79 to 83 degrees Fahrenheit (26 and 28 degrees Celsius).
- Hygrometer (humidity gauge).
- Timer to switch lights on and off when you are not at home. Timers can also be useful for feeding in a hydroponic system.
Lighting
For the vegetative stage of your grow, you will want a grow light of around 100-125 watts. To trigger flowering (after around 4-6 weeks of vegetation), you will want a grow light of about 250 watts and above. Other things you will need for your light include:
- A ballast to regulate and control the supply of energy needed to power the light.
- A reflector surrounding the top of the light to direct the light downwards towards your plants.
- A lamp of suitable wattage. You will want to keep the wattage between 250 and 400 watts for smaller grow rooms without much head room. Too high a wattage, and it can actually diminish returns as the room gets too hot.
- A heavy chain or another material strong enough to hang your lights
There are also different types of lights filled with different gases. During the vegetative stage, most opt for metal halide lights as they produce more blue light. During flowering, sodium lights are preferred as they produce more red light. Fluorescent lights can be useful for plants when they are young and in the seedling stage or for propagating plants (that is, creating a new generation of plants).
LED lights are becoming more commonplace as they are more energy efficient, don’t need to warm up, and can be used throughout the growing process, but they can have a large upfront cost.
Supplementary grow lights like plasma and CDM can enhance bud production, but these are not necessarily required for smaller grow rooms.
Fan Placement
Plants need fresh air and carbon dioxide (CO2) to grow, so it’s important not to let the air in your grow room become stagnant. Air circulation is vital. This is where extractor fans and intake fans come into play.
The primary purpose of an extractor fan is to remove warm air from the room. Because warm air rises, your extractor fan must be placed high up in the room. Your intake fan is responsible for bringing fresh air into the area. It is placed on the opposite side of the room. Ultimately, your size and number of fans will depend on how big (or small) your grow space is.
In addition to fans, depending on where your grow space is, you may also need a dehumidifier or AC unit to help regulate the humidity or the temperature in the room.
Choosing an Indoor Grow Medium
One of the advantages of growing cannabis indoors is that you get a high degree of control over your grow. You can control the nutrients, the lights, and how much water the plant gets. You can even choose the type of medium it grows in, like soil, hydroponic trays, and more.
For beginners, starting with soil growing or a soil-coco coir mix is generally recommended, as soil already contains most of the nutrients the plant needs. You may only need the occasional top-up by mixing nutrients into distilled water and applying it to the soil. Beginners may also fare well with coco coir-only growing mediums, but some nutrient experience is ideal before coco coir-only grows, as you will need to feed the plants yourself.
Hydroponics or aquaponics is another option, but these methods are more expensive, harder to maintain, and come with a steeper learning curve. You’ll have to learn how much nitrogen (N), phosphorus (P), and potassium (K) each plant needs and feed the plants yourself.
How to Grow Cannabis Indoors
Growing cannabis from seed to harvest involves key steps, including choosing the right seeds, understanding your plants’ lighting and temperature needs during each growth stage, and checking in regularly to ensure your equipment is running properly.
Step 1: Choose the Right Seeds
The first step to growing weed indoors is to start with the right cannabis seeds. What makes a good seed? For starters, you’ll want one that is dry, dark-colored, and hard — ideally, one purchased from a reputable seed source.
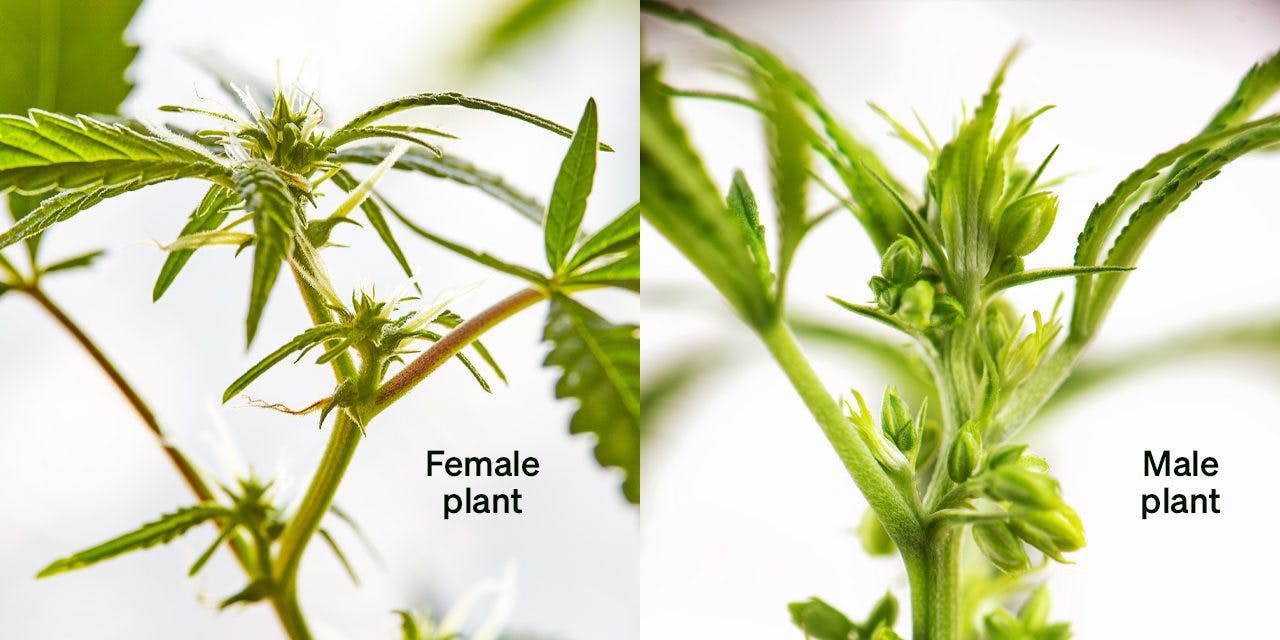
When you’re buying seeds, you’ll be able to choose between feminized and non-feminized seeds. Opting for feminized seeds can save you some time. Non-feminized seeds can help for breeding purposes, but many tend to get rid of their male plants if they are not breeding.
Many cannabis varieties have been bred with indoor and discrete grows in mind. Some examples include:
- Skunk #1
- Northern Lights
- Blueberry
- Blue Dream
- Master Kush
- OG Kush
- Sour Diesel
Those just starting out may want to stick to auto-flowering or feminized seeds. These are short, squat varieties of cannabis that can grow in colder climates and mature when they reach a certain age rather than a light cycle. Autoflowering strains are crossed with other types of cannabis to increase THC production.
Hybridized strains are more resistant to mold, mildew, pests, and other diseases, are easier to grow and can produce larger yields than non-hybridized (landrace) strains.
Step 2: Germinate and Wait for Seedlings to Emerge
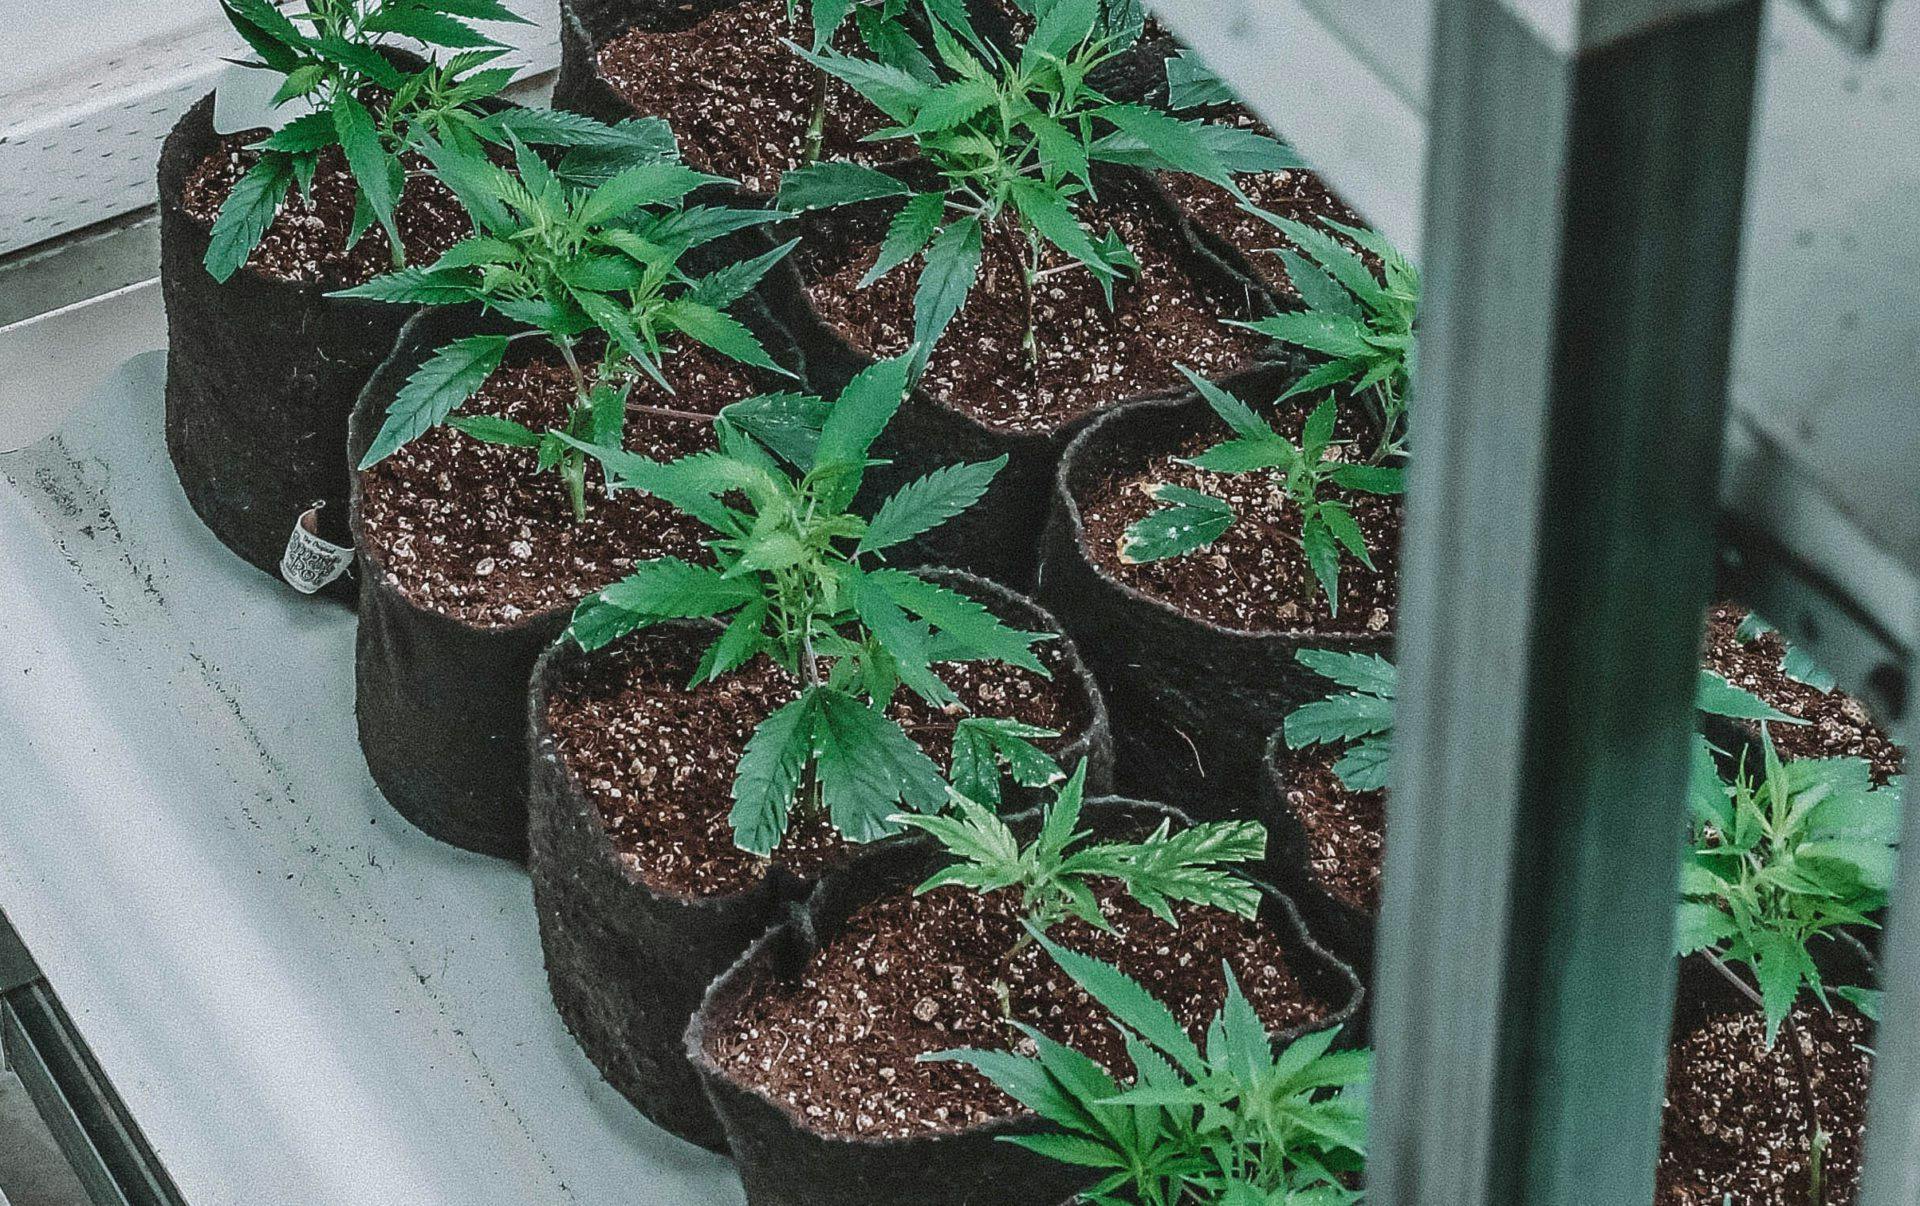
To germinate your seeds, soak them on paper plates or between paper towels and wait for a taproot to emerge. It can take a few days for this to occur. Once your seedlings emerge, it’s time to transfer them into the growing medium (if using soil, for example, you will transfer them to fabric pots filled with soil). You’ll want to plant them about 10 mm deep in the medium. Keep it damp, but be sure not to overwater.
Step 3: Move Into the Vegetative Stage
The next step is to wait for your marijuana plants to move into the vegetative stage. You will provide about 18-24 hours a day of light, along with temperatures around 70 to 85 degrees Fahrenheit. You will need to water regularly, supplying extra nutrients (particularly nitrogen). If you didn’t get feminized seeds, you will need to remove all male plants at this point, too.
You can buy clones from a dispensary if you want to avoid finding the right seeds to buy and the germination process. This can help you find an appropriate plant for your needs with far less work, and you can avoid the vegetative growth stage entirely.
Optional Advanced Step: Train Your Plants
During the vegetative state, some more advanced indoor growers begin training their plants using the Sea of Green (SOG) method or the Screen of Green (SCROG) method. These techniques are used to train the plant to maximize yield.
The SOG technique requires keeping a mother plant in a permanent vegetative stage and then taking cuttings from the mother plant (propagation). You can put these cuttings straight into a 12-dark/12-light flowering cycle. This can shorten overall growing times and increase the number of grows you can do in a year. This method is generally better for short, squat plants and creating a dense growth area.
The SCROG technique, on the other hand, involves using a wire grid, where the grower weaves the plant’s branches through the mesh. This allows the grower to redirect individual branches lengthwise across the screen and achieve a flat, horizontal canopy. The SCROG method is ideal for large plants which would otherwise outgrow your room and where all plants are growing to a similar size.
These techniques are generally not recommended for beginners. It’s best to get a few grows under your belt before training your plants, although the SOG technique may be simple enough to employ for most people, even with little experience.
Step 4: Enjoy the Flowering Stage
In the flowering phase, female plants will develop thick, heavy-scented buds as their energy is focused on bud development. They’ll grow much larger as the buds, hairs, resin glands, and trichomes develop. This is when you move to a light cycle of 12 hours of dark and 12 hours of light.
Stop training your plants, and towards the end of flowering, stop giving nutrients and start to flush your plants using just water.
Depending on the type of plant, most cannabis strains finish flowering between six and 14 weeks. Indicas and auto-flowering strains usually finish flowering between six and nine weeks, hybrids eight to 12 weeks, and sativas between 10-14 weeks. This is not a hard-and-fast rule, but most cannabis plants of different types follow this pattern.
The phenotype expressed matters as well. For example, a hybrid that expresses indica will likely finish flowering sooner than a hybrid that expresses sativa.
Some people also decide when to finish flowering by looking at the plant’s trichomes (glandular hairs). This can help growers determine when the plant’s cannabinoids and terpenes are fully formed. The trichomes usually go from clear, then cloudy, then amber.
Many people harvest when most trichomes are an even mixture between cloudy and amber. For some, harvesting too early in the cloudy stage can lead to a more uncomfortable experience. In contrast, harvesting when several trichomes are amber can impart a more “relaxed” and less overwhelming experience.
Step 5: Harvest and Cure Your Plants
After all of your hard work, you get to enjoy the harvesting and curing process. You’ll want to cut the main stem and then hang the plants to dry. Trimming and curing are the last steps, which can take up to five weeks to complete.
Learn more about harvesting in our article about harvesting your plants. And read more about drying and curing in our step-by-step guide, “Drying and Curing Cannabis.”
The Bottom Line
Growing cannabis can be expensive initially, but over the course of a year, it can save you a lot of money, as you won’t need to buy heavily-taxed products from a dispensary. You can grow varieties that aren’t found at your dispensary as well. Safety is another advantage, as you can be sure that harsh chemical pesticides aren’t used on your plants.
In states where growing cannabis is legal, the maximum number of plants allowed per household is generally higher for medical marijuana patients (as opposed to recreational users). To grow more plants and maximize your yield, connect with Leafwell’s virtual clinic to register for your medical marijuana card today.
Get Your Medical Marijuana Card
Connect with a licensed physician online in minutes.